I’ve managed this blog since 2011. I’m also a primary contributor to the documentation managed by my team. For example: on-boarding guide for new colleagues or a tourist, technical guides, definition of done, architecture decision records and more. As you perhaps already know, software engineers don’t like writing technical documentation. And as you also know, high quality documentation has tremendous benefits for the engineering team or organization.
Today, I would like to share my experiences on how to choose appropriate tools for writing better documentation.
Documentation as a code
Documentation as a code is a key enabler for all tools and practices presented in this blog post. It enables the culture where developers take ownership of documentation. With documentation as a code culture, developers:
- Write documentation with the same tools and processes they use for development.
- Keep the documentation in the source code repository, close to the code.
- Write and refactor code and documentation together.
- Apply best practices like code review or pair programming.
- Automate documentation tests and deployments.
I used to write documentation using Atlassian Confluence Wiki platform. Regardless of efforts, the documentation was always rusty.
Markup language selection
Use whatever plain text markup you like: Markdown, reStructuredText, AsciiDoc, DocBook or LaTeX. Check only, if the format meets the following criteria:
- Must be readable using a plain text editor. How to make a code review for non-readable formats?
- Must be portable without worrying about compatibility. It’s likely that you will change the publication platform several times during documentation life.
- Must separate the content and its formatting. Writers should focus on content and semantics not on look and feel.
- Should be easy to learn, and forgive syntax mistakes.
- Should be widely supported by developers tools.
I used to write documentation using Latex and DocBook. Although, for the last 10 years I’ve been using Markdown.
Markdown into static website conversion
Markdown is perfect for a single README, but how to build documentation consists of many pages? Some parser must convert a bunch of Markdown files into a beautiful website.
Again, use whatever converter you like but check if the following capabilities exist for generated website:
- Website navigation, you must be able to see website structure and navigate between pages.
- Many themes, you expect different layout for documentation websites and different for personal blogs.
- Table of contents, it simplifies navigation for complex pages.
- Search capabilities, documentation without search isn’t so useful.
Because you are writing technical documentation look also for:
- Code syntax highlighting for many popular programming languages (Rouge or Chroma).
- Diagrams and visualizations (Mermaid or yuml)
- Math expressions (MathJax)
At the time of writing my favorite Markdown converter is Jekyll but I would also like to check Hugo.
With Jekyll you can serve your website locally using the following command:
1
2
3
4
5
6
7
8
9
10
11
12
$ jekyll serve --livereload
Configuration file: /Users/marcin/tmp/site/my-new-site/_config.yml
            Source: /Users/marcin/tmp/site/my-new-site
       Destination: /Users/marcin/tmp/site/my-new-site/_site
 Incremental build: disabled. Enable with --incremental
      Generating...
       Jekyll Feed: Generating feed for posts
                    done in 0.404 seconds.
 Auto-regeneration: enabled for '/Users/marcin/tmp/site/my-new-site'
LiveReload address: http://127.0.0.1:35729
    Server address: http://127.0.0.1:4000/
  Server running... press ctrl-c to stop.
Every edit re-generates pages for modified files and reloads the web browser. Convenient way of writing documentation, you continuously observe the results of editing.
“Minimal Mistakes” theme
For my personal blog I use minimal-mistakes theme. Advertised as “perfect for hosting your personal site, blog, or portfolio.” Look at https://github.com/mkuthan/mkuthan.github.io repository if you want to know, how to get minimal but fully functional blog posts website like this one 😀
“Just the Docs” theme
For technical documentation I prefer just-the-docs theme. Below you can see documentation site of my team (please note that we’re during migration from Wiki and the site isn’t finished yet):
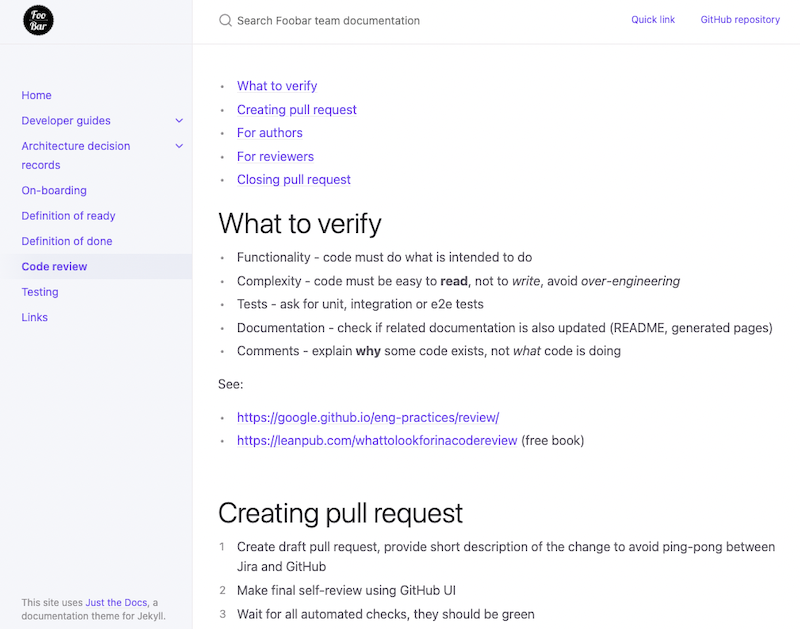
I couldn’t open source code of the repository but I will be glad to share with you essential configuration and customizations.
Gemfile with Ruby dependencies for local run:
1
2
3
source 'https://artifactory.allegrogroup.com/artifactory/rubygems.org'

gem 'github-pages', '~> 227', group: :jekyll_plugins
Jekyll configuration file _config.yml:
1
2
3
4
5
6
7
8
9
10
11
12
13
14
15
16
17
18
19
20
21
22
23
24
25
26
27
28
29
30
31
32
33
34
title: "Foobar team documentation"
url: https://foobar-documentation.gh.allegrogroup.com
logo: /assets/images/foobar-logo.png
remote_theme: just-the-docs/just-the-docs

# color configuration for {: .note } and {: .important }
callouts:
  note:
    color: blue
  important:
    color: red

# enable mermaid graphs
mermaid:
  version: "9.1.7"

# enable footer link for easy navigation to the top of the page
back_to_top: true
back_to_top_text: "Back to top"

# enable footer link to the GitHub editor for the page
gh_edit_link: true
gh_edit_repository: https://github.com/allegro-internal/foobar-documentation
gh_edit_link_text: "Edit this page on GitHub"
gh_edit_branch: "master"
gh_edit_view_mode: "edit"

# header links
aux_links:
  "Quick link":
    - "https://c.qxlint/foobar"
  "GitHub repository":
    - "https://github.com/allegro-internal/foobar-documentation"
aux_links_new_tab: true
Customized _layout/page.html to automatically generate a table of contents on every page.
See jekyll-toc repository for _includes/toc.html file.
1
2
3
4
5
6
---
layout: default
---
<!-- generate TOC on every page, see _includes/toc.html -->
{% include toc.html html=content %}
{{ content }}
That’s all folks, Jekyll and “Just the Docs” theme do all the hard work and you could focus on writing the documentation.
Publication automation
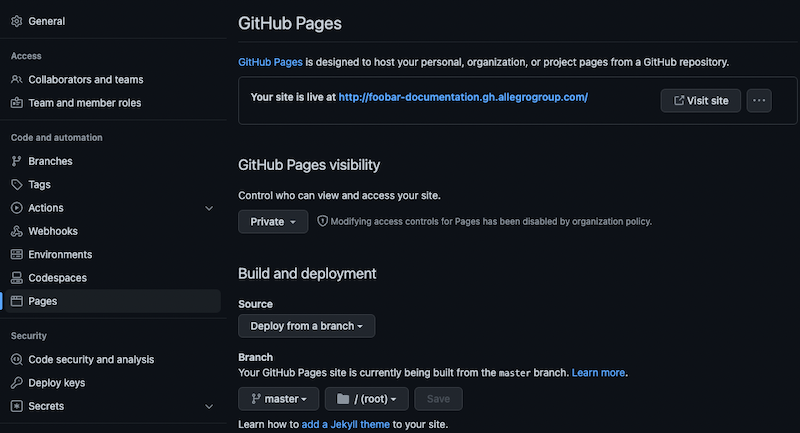
The ultimate goal of the automation is to deploy documentation on every commit or merge to the main branch of the repository. GitHub provides GitHub pages, hosting service that takes HTML, CSS and JavaScript files from a repository, runs the files through a build process, and publishes a website.
If you use only allowed Jekyll plugins and remote theme, GitHub publishes the site automatically. You only have to configure the “Pages” section in the repository settings.
GitHub action
If you are using plugins not supported by GitHub Pages, you have to build the website using GitHub actions. Below you can see the action I configured for my blog:
1
2
3
4
5
6
7
8
9
10
11
12
13
14
15
16
17
18
19
20
21
22
23
24
25
name: Publish

on:
  push:
    branches:
      - master

jobs:
  jekyll:
    runs-on: ubuntu-latest

    steps:
      - uses: actions/checkout@v3
      - uses: ruby/setup-ruby@v1
        with:
          ruby-version: "2.7"
          bundler-cache: true

      - run: bundle exec jekyll build

      - uses: peaceiris/actions-gh-pages@v3
        with:
          github_token: ${{ secrets.GITHUB_TOKEN }}
          publish_branch: gh-pages
          publish_dir: ./_site
- To speed up the build configure cache for Ruby gems (line 17). Without the cache build takes 6 minutes, with cache 40–50 seconds.
- Push generated website from
_sitedirectory (line 25) togh-pagesbranch (line 24) and configure repository to watch for the documentation in that branch instead of master or main.
According to KISS principle, I would prefer automated publication from GitHub Pages than custom action.
Dependant bot
To keep Ruby gems and GitHub actions up-to-date configure Dependant Bot in .github/dependantbot.yml file:
1
2
3
4
5
6
7
8
9
10
version: 2
updates:
  - package-ecosystem: "github-actions"
    directory: "/"
    schedule:
      interval: "weekly"
  - package-ecosystem: "bundler"
    directory: "/"
    schedule:
      interval: "weekly"
Bring editorial style guide to life
You are a developer not a technical writer, so any automated writing help is more than welcome. Recently I found an excellent framework vale.sh for creating and enforcing custom rules. Fortunately you don’t have to develop the rules from scratch, vale.sh provides ready to use styles, for example:
- Microsoft writing style guide
- Google developer documentation style guide
- Red Hat supplementary style guide for product documentation
- Proselint - a linter for prose
On my blog I use “Microsoft writing style guide” and “Proselint” writing styles together. Below you can find a few code review comments for this blog post generated by vale.sh:
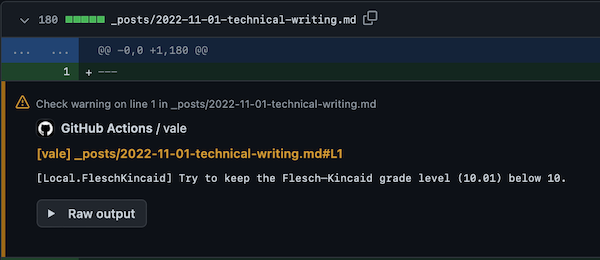
Flesh Kincaid grade level rule. The number of years of education generally required to understand the text 😂

If a series has more than three items or the items are long, consider a bulleted list to improve readability, explanation.

Use singular first-person pronouns sparingly, explanation.
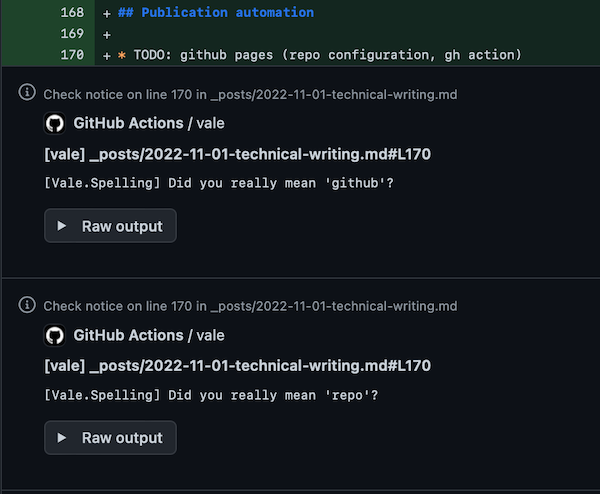
Fix all typos or define your own vocabulary.
Check all styles provided as vale.sh packages and choose the one or two suits best for your writing needs. Using many styles together gives you redundant alerts, more isn’t always better.
vale.sh configuration
Define .vale.ini configuration file:
1
2
3
4
5
6
StylesPath = .github/vale
Vocab = Blog
Packages = Microsoft, proselint

[*.md]
BasedOnStyles = Vale, Local, Microsoft, proselint
- vale.sh installs packages under
.github/valedirectory, line 1 - Define custom vocabulary under
.github/vale/Vocab/Blogdirectory, line 2 - Install “Microsoft” and “proselint” packages, line 3
- Apply built-in vale.sh rules, local rules and rules from installed packages, line 6
Define custom vocabulary in .github/vale/Vocab/Blog/accept.txt and .github/vale/Vocab/Blog/reject.txt files.
See reference documentation for more details about the syntax.
Define custom rules in .github/vale/Local directory, for example Flesh Kincaid grade level rule looks as follow:
1
2
3
4
5
6
7
8
extends: metric
message: "Try to keep the Flesch–Kincaid grade level (%s) below 10."
link: https://en.wikipedia.org/wiki/Flesch%E2%80%93Kincaid_readability_tests

formula: |
  (0.39 * (words / sentences)) + (11.8 * (syllables / words)) - 15.59

condition: "> 10"
vale.sh usage
Vale compiles into a fast, dependency-free binary for macOS, Windows, and Linux.
- Install the binary:
brew install vale - Install or update packages:
vale sync, don’t commit installed packages! - Check a document:
vale document.md, or all documents in a directory:vale ./directory
You should get the results like this:
1
2
3
4
5
6
7
8
9
10
11
12
13
14
15
16
17
18
19
20
21
22
23
24
25
26
27
28
29
30
31
$ vale _posts/2022-10-24-technical-writing.md
 _posts/2022-10-24-technical-writing.md
 33:70   suggestion  Use the Oxford comma in         Microsoft.OxfordComma
                     'AsciiDoc, DocBook or LaTeX.'.
 65:81   suggestion  Did you really mean 'yuml'?     Vale.Spelling
 89:1    error       Remove 'Very'.                  proselint.Very
 91:5    suggestion  '"Minimal Mistakes" theme'      Microsoft.Headings
                     should use sentence-style
                     capitalization.
 98:5    suggestion  '"Just the Docs" theme'         Microsoft.Headings
                     should use sentence-style
                     capitalization.
 101:67  warning     Try to avoid using              Microsoft.We
                     first-person plural like 'we'.
 181:5   suggestion  'GitHub actions' should use     Microsoft.Headings
                     sentence-style capitalization.
 216:15  suggestion  'KISS' has no definition.       Microsoft.Acronyms
 246:4   suggestion  Did you really mean             Vale.Spelling
                     'Proselint'?
 248:55  suggestion  Did you really mean             Vale.Spelling
                     'Proselint'?
 252:8   suggestion  Did you really mean 'Kincaid'?  Vale.Spelling
 282:28  suggestion  Did you really mean             Vale.Spelling
                     'proselint'?
 288:74  suggestion  Did you really mean 'Kincaid'?  Vale.Spelling
 309:5   suggestion  'GitHub action' should use      Microsoft.Headings
                     sentence-style capitalization.
 335:3   error       'TODO' left in text.            proselint.Annotations
 335:41  suggestion  Did you really mean 'jekyll'?   Vale.Spelling

✖ 2 errors, 1 warning and 13 suggestions in 1 file.
As you see, custom vocabulary definition is a must.
Vale.Spelling rule kindly reminds you with the “Did you really mean” question every time you use an unknown word.
GitHub action
If you want to get pull request comments from vale.sh define GitHub action using vale-action.
The action installs vale.sh packages, checks documents under _post directory and adds comments to the pull request.
1
2
3
4
5
6
7
8
9
10
11
12
13
14
15
name: Lint

on: [ pull_request ]

jobs:
  lint:
    runs-on: ubuntu-latest
    steps:
      - uses: actions/checkout@v3

      - uses: errata-ai/vale-action@v2
        with:
          files: _posts/
        env:
          GITHUB_TOKEN: ${{ secrets.GITHUB_TOKEN }}
Pull request comments are useful only if they’re context aware.
Action vale-action put comments only for the modified files, thanks to reviewdog framework.
Markdown editor
With plain text markup like Markdown you can edit documents in any text editor. Why not make your life easier with a more sophisticated tool? If you have never used Visual Studio Code give it a try.
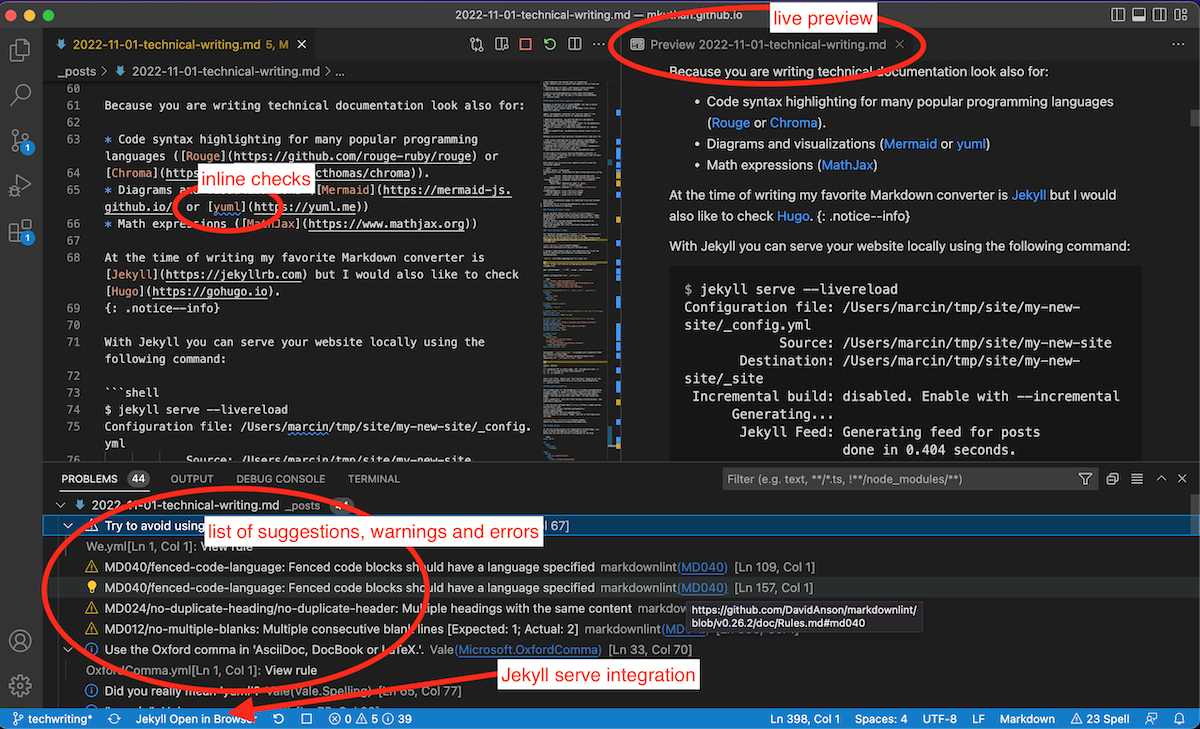
I fell in love with Visual Studio Code because:
- Excellent Markdown editor: fast and exact preview, outline view, path completions, link validation, smart selection and more.
- Vale extension, makes your vale.sh styles visible during editing.
- Jekyll run extension, you can run Jekyll server from Visual Studio Code.
- Markdown lint extension, over 50 useful linting rules. See also GitHub project markdownlint.
- Code spell checker extension, useful until vale extension doesn’t support quick fixes for spelling.
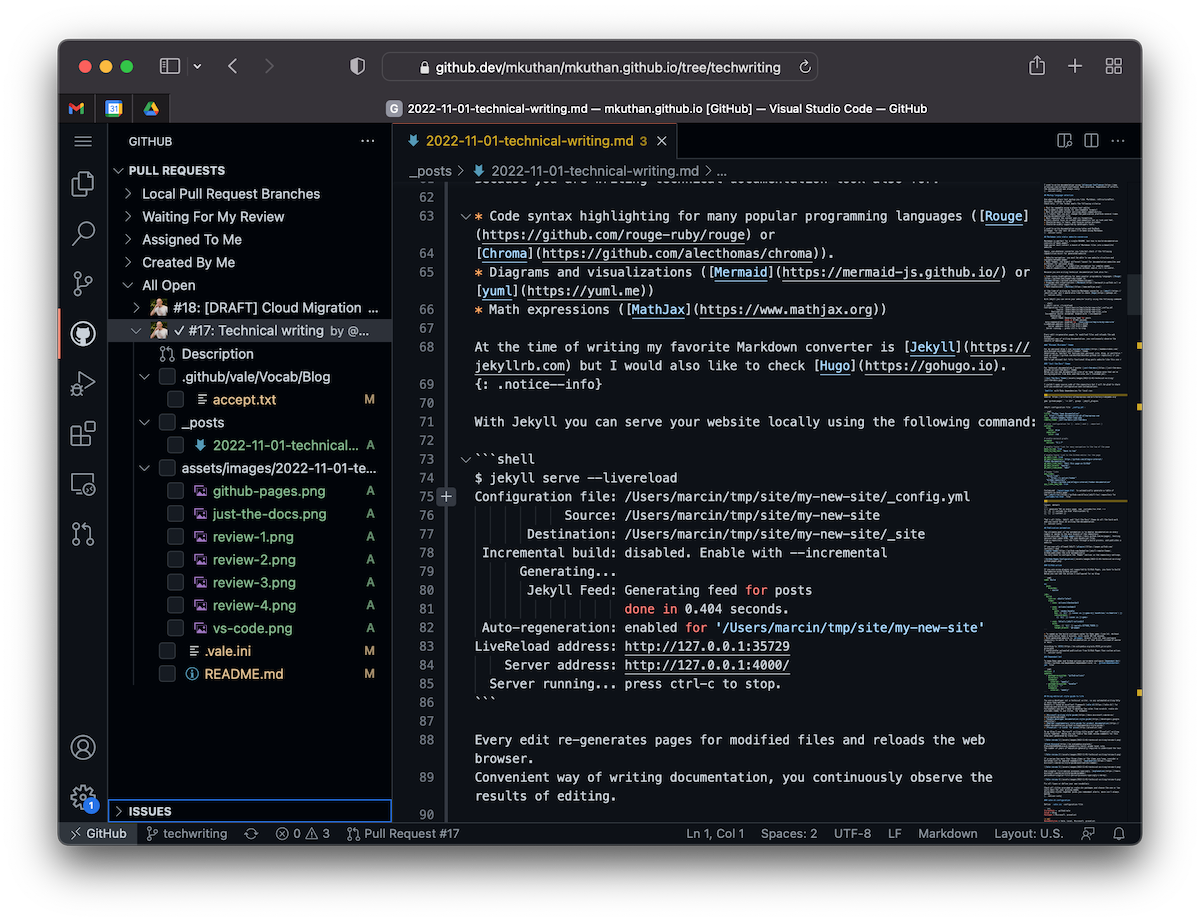
- Zero-install Visual Studio Code edition, running entirely in your browser. Don’t expect all features available in the desktop edition but you can edit Markdown files with pleasure.
Summary
- Keep documentation as code, and apply all development best practices and processes to give high final product quality.
- Choose plain text markup wisely, you must have a good reason to not use Markdown.
- Shorten feedback loop, you should get all suggestions and corrections when writing. Re-generate the website locally on every save.
- Apply one of the existing documentation styles from Microsoft, Google or Red Hat. Use vale.sh to get automated pull request comments to your documents.
- If you already host the code and documentation on GitHub, use Jekyll for generating websites and GitHub Pages for publishing.
Comments